John McCormack DBA

SQL Server Databases and Cloud

  • Personal
    • About
  • Free Training
    • SQL Server on Amazon RDS (Free Course)
    • Free practice questions to help you pass DP-900
  • Save money in Azure
    • Azure IaaS SQL Backups – Stop burning money
    • Your Azure SQL Database and Managed Instance is too big
    • Turn the cloud off at bedtime to save 70%
    • Your Azure SQL Virtual Machine might be too big
    • Save money with Azure SQL DB serverless
    • Save up to 73% with reserved instances
    • Delete unused instances to save money in Azure
  • Hire me
    • 60 minute cost optimization
    • Let me solve your SQL Server problems
    • Take a look at my Sessionize speaker’s profile

Your Azure SQL Virtual Machine might be too big

19th January 2021 By John McCormack Leave a Comment

Cost optimisation

This is post #4 in my series on 7 ways for data teams to save money in Azure. Cost optimisation is crucial to any organisation that operates in the cloud, as costs can and do run away from away you without regular attention.

To avoid repetition of my my post regarding the size of your Azure SQL DBs, please read that to understand the concepts of elasticity, scalability and CAPEX vs OPEX.

One great thing about the cloud is that you can change your mind, or adjust as you go along. Unlike days gone by where you would have a bought a giant SQL Server and ran about 10% utilisation (just to allow room for future growth), you can be much smarter now and only pay for what you need.

Is my instance oversized?

You should be collecting metrics on CPU and memory, as well as looking at your throughput and disk latencies to see how well you are sized. If your CPU is always below 50%, including spikes and you haven’t identified memory pressure, you can look at scaling down. In an ideal world, you should run load tests against the old and new instance types, and compare them before making a decision. Cutting CPUs will give you the biggest financial saving in Azure due to the way that licensing works.

Is my instance undersized?

If your CPU is regularly pinned above 85%, you need to take action. Scaling up is one option, improving your queries is another. Some people will choose to scale up and then plan fix their queries, with the ambition to scale back down again later. In my experience, this rarely happens and they just accept the new instance size as normal. Other work becomes the priority. If you can hold off scaling your instance to give you time to fix your expensive queries first, I would recommend it.

Try not to rush a decision, there are so many instance types and sizes to choose from, each one optimised for a different use case. Do your research and choose the most appropriate instance type, not just next the one up.

I do need more compute power, what’s next?

SQL Server is licensed by the core. The more cores, the higher your licensing costs. However although instance classes tend to double cores and memory as you step up to the next level, there is a smarter way to do it. If you have determined that you don’t need more CPU but you do need more memory, look into the memory optimised instances such as the E-Series.

Looking at the table below, imagine you are on a D16 V4 which provides 64 GB of RAM, but you need to increase your RAM to 128 GB. If you choose the next highest D-Series machine (D32 V4), you double your costs. You might get the extra cores, and they will also help performance, but the expense is unjustified.

Consider instead changing to an E-Series (E16s V4) where you can keep your cores at 16, meaning no change to Windows or SQL licensing costs but you also get the desired 128 GB of RAM. You only pay £158 more per month. *

Instance TypeCPUsMemory (RAM)Monthly cost
D16 V41664 GBCompute £505.45
OS (Windows) £400.44
SQL Licence £3,264.45
Total £4,170.34
D32 V432128 GBCompute £1011.44
OS (Windows) £800.88
SQL Licence £6,528.91
Total £8,341.22
E16s V416128 GBCompute £663.77
OS (Windows) £400.44
SQL Licence £3,264.45
Total £4,328.67
* Prices taken from Azure Calculator on 18/1/2021. Subject to change

Constrained CPU Instances

For memory intensive applications such as SQL Server, constrained CPU instances provide another tool in the battle for cost optimisation.

Say you actually needed 256 GB of RAM but you would still be ok with 16 cores. Sticking with the D-Series, you would need to go up to 64 cores to get the desired memory. You can take the idea of memory optimisation a step further with constrained CPU instances. With these, you get the extra CPUs but they are not available to you. This allows an instance with even more RAM than the memory optimised instances. This means that whilst you have increased compute costs, you don’t have increased license costs as you only pay licenses based on available CPUs. This is a significant saving as you move into higher instance tiers.

Instance TypeCPUsMemory (RAM)Monthly cost
D64s V464256 GBCompute £2,022.33
OS (Windows) £1,601.76
SQL Licence £13,057.81
Total £16,681.90
E32 16s V416 available256 GBCompute £1,327.00
OS (Windows) £800.88
SQL Licence £3,264.45
Total £5,392.33
* Prices taken from Azure Calculator on 18/1/2021. Subject to change

Cost optimisation summary

Don’t provision for what you will need in the future, size your instance for what you need now and keep on top of it. Changing is quick and easy. Be aware of non standard instance types like memory optimised and Constrained CPU to maximise savings against your SQL licensing costs.

Play about with the Azure pricing calculator in order to compare instance types.
IT Certification Category (English)728x90

Filed Under: cost-optimization, front-page Tagged With: azure, azure iaas, cost optimisation, cost optimization

IaaS++ (Azure SQL Server IaaS Agent Extension)

11th December 2020 By John McCormack 1 Comment

IaaS++

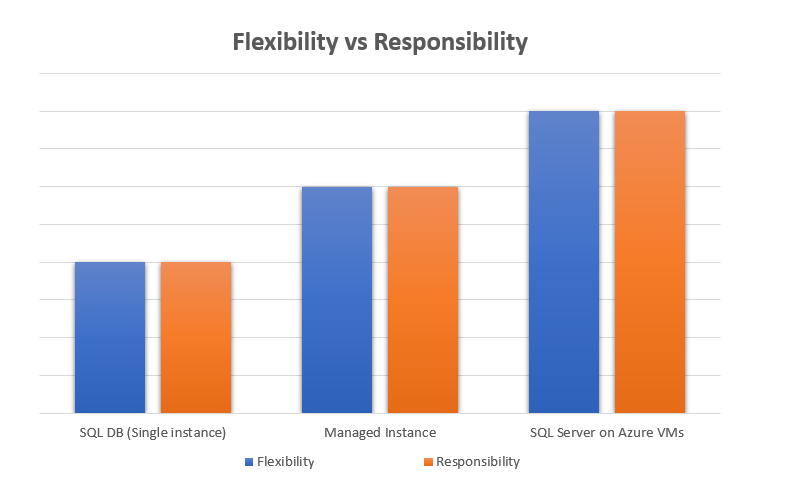
Most DBAs or cloud practioners have seen a graph similar to this ⬇. It shows the flexibility and responsibilities between different methods of adopting SQL in Azure. SQL on VMs gives you the most flexibility but also the most administrative work. SQL DB single instance handles almost all of the “heavy lifting” (things like backup,os patching, installation etc), but gives you the least flexibility. Azure SQL DB managed instance lies some where in between. SQL on VMs are known as Infrastructure As A Service (IaaS). SQL DB (Single DB or managed instance) are known as Platform As A Service (PaaS).

flexibility vs responsibility graph

But now there is another option, called SQL Server IaaS Agent extension. I think of it as IaaS++ as it extends your SQL VMs to give them some of that heavy lifting funtionality that the PaaS offerings provide, whilst still allowing you full control over the instance.

What do you get with SQL Server IaaS Agent extension?

The main two items I will go into here are automated backups and automated patching. These are a standard on most PaaS products, with all cloud providers, however it is only down to the introduction of this “IaaS++” extension, that you can now get this for SQL on VMs.

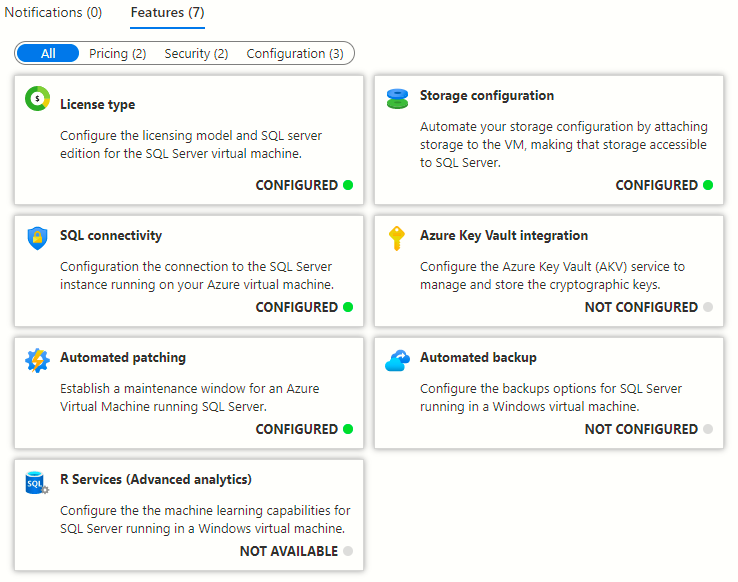
You can also configure storage, high availability, Azure Key Vault integration and R services, as well as enabling a subscription wide view of all your instance and license types, however this post only focuses on automated backups and patching.

Real world scenarios

Patching

My client had fallen behind with patching and needed to ensure that important servers were patched regularly. By enabling automated patching, it meant that they could have only the important patches applied during an agreed window, and then look at other patches and cumulative updates when it suited them. They had a test environment that mirrored production, with a 3 node availability group cluster. (Automatic failover was enabled) so I was able to test the solution there, before going anywhere near production. The plan was as simple as this:

  1. Add a 90 minute window at 12:00 for Server1
  2. Add a 90 minute window at 02:00 for Server2
  3. Add a 90 minute window ar 04:00 for Server3.

This approached allowed 30 minutes at the end of each window for VMs to be restarted before the next VM’s window would start.

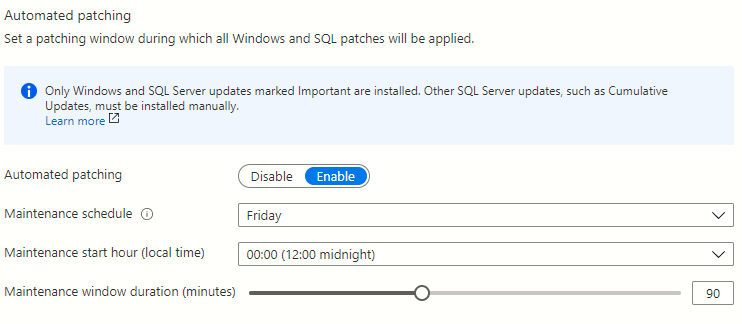
  • Click on automated patching from the SQL Virtual Machine in Azure Portal.
  • Update the toggles to set your patching window.
  • Daily or weekly schedules can be chosen.
  • If patches are applied, your VM will be restarted.
IaaS Extension Automated Patching

This approach allowed them to move from 44 outstanding patches to 4 on 3 servers without manual intervention. Failovers happened seemlessly. I’d just urge a word of caution with critical production systems, as this will restart your VMs. Are you ready for that? My advice is get comfortable with it on non prod systems before starting on production.

I think it’s a great feature. It’s not always possible to just go to Managed Instance so for those of us who need a full SQL install, this is a handy hybrid.

Backups

Another client was using the Ola Hallengren solution for managing backups. It’s the best solution out there when you need to configure your own backups but what if your cloud provider will do it for you? This client also didn’t have an experienced DBA, so in this case, it is better to let Microsoft do it. What’s more, you can configure a retention period between 1 and 30 days to stop your storage costs from ever increasing.

Before starting, make sure you don’t have your own backup solution running in parallel.

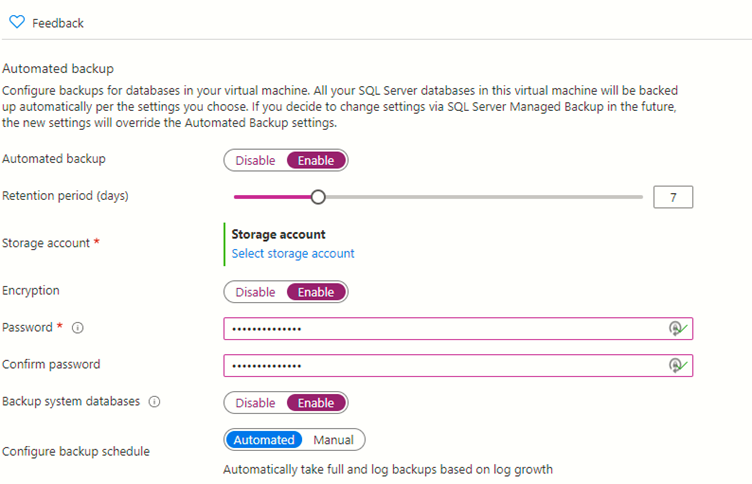
  • Click on automated backups
  • Configure the toggles to suit your needs
  • Link it to a storage account
  • Check your backups are working as expected and can be restored

These tasks can be automated as well using PowerShell or Azure CLI. I’ll maybe cover this in a future blog.

Popular posts on johnmccormack.it

How do I set up database mail for Azure SQL DB Managed Instance
Put tempdb files on D drive in Azure IAAS

Filed Under: Azure, Azure SQL DB, Azure VM, front-page Tagged With: azure, azure iaas, IaaS++, SQL server

How do I set up database mail for Azure SQL DB Managed Instance

5th October 2020 By John McCormack 2 Comments

How do I set up database mail for Azure SQL DB Managed Instance

It’s not too difficult to set up database mail for Azure SQL DB Managed Instance in comparison to SQL Server (on-prem or IaaS) however there are a few extra things to consider. This post will describe how to set up database mail for Azure SQL DB Managed Instance. I will use Sendgrid as the mail provider but you can follow the same steps for any other mail provider or your company’s smtp server.

Before I go on, my personal opinion is that including database mail is a massive feature for Managed Instances. The lack of DB Mail on Azure SQL DB Single Database or Amazon RDS is a major blocker to PaaS adoption. Now with Managed Instance, we can have PaaS and database mail.

Create an Azure SQL DB Managed Instance

Whilst I’m planning a separate post on how to provision an Azure SQL DB Managed Instance, I’m going to assume for the purposes of this post that you already have an instance up and running. If you don’t, have a look at this howto article before going any further.

Change outbound settings on your Network Security Group (NSG)

All managed instances are created with a NSG. The NSG allows you to create inbound and outbound rules for traffic coming in and out of your database. You can configure ports, protocols and IP ranges etc.

To allow secure smtp for sendgrid, you must open port 587 for outbound traffic. Otherwise, any attempt to send mail will result in an error. You can do this in the Azure Portal by navigating to the NSG or you could do it in Powershell by modifying and running the code below.

# This code was originally taken from https://docs.microsoft.com/en-us/azure/service-fabric/scripts/service-fabric-powershell-add-nsg-rule
# and amended to be used to set up an outbound rule for Database Mail on Port 587

Login-AzAccount
Get-AzSubscription
Set-AzContext -SubscriptionId "yourSubscriptionID"

$RGname="RG-JOHN-DEMO"
$port=587
$rulename="DBMailOutbound"
$nsgname="nsg-johnmccormack-demo"

# Get the NSG resource
$nsg = Get-AzNetworkSecurityGroup -Name $nsgname -ResourceGroupName $RGname

# Add the inbound security rule
$nsg | Add-AzNetworkSecurityRuleConfig -Name $rulename -Description "Allow DBMail" -Access Allow `
-Protocol * -Direction Outbound -Priority 500 -SourceAddressPrefix "*" -SourcePortRange * `
-DestinationAddressPrefix * -DestinationPortRange $port

# Update the NSG
$nsg | Set-AzNetworkSecurityGroup

Set up a sendgrid account

The simplest way if you haven’t done it before is just to use the Azure Portal.

  1. Start typing sendgrid in the search bar
  2. Click on Sendgrid accounts from services
  3. Click + Add
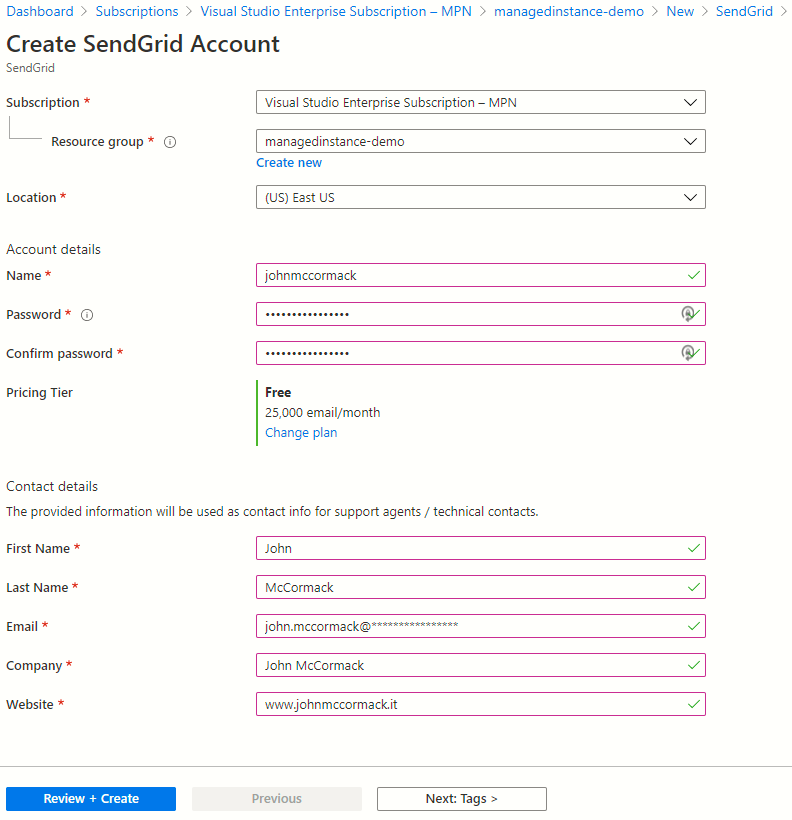
  4. Complete the form to create your new account. (See image at bottom of post)
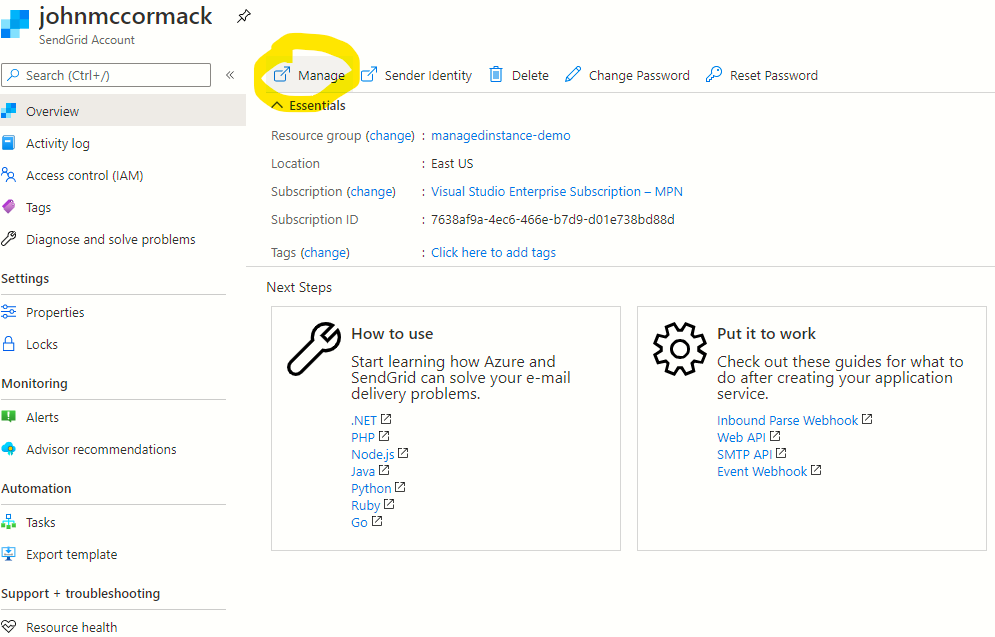
  5. Click manage sendgrid to get the credentials you will need for Database Mail (See other at bottom of post)
    1. Once you are logged in:
      1. Click Settings
      2. Click API Keys
      3. Click Create API Key
      4. Create and verify a sender identity. (If you don’t do this, no sendgrid emails will work)

Enable database mail for your Managed Instance

You must run this t-sql code to enable database mail on your Managed Instance:

EXEC sp_configure 'show advanced options', 1
RECONFIGURE

EXEC sp_configure 'Database Mail XPs', 1
RECONFIGURE

Create a suitable database mail account and profile

Your database mail profile must be called AzureManagedInstance_dbmail_profile. If you try to call it anything else, your database mail won’t work.

-- Create a database mail account
IF NOT EXISTS (SELECT 1 FROM msdb.dbo.sysmail_account WHERE [name] = 'DBA Sendgrid Account')
BEGIN
DECLARE @servername NVARCHAR(255) = @@servername
SET @servername = substring(@servername, 1, charindex('.', @servername)-1)
EXECUTE msdb.dbo.sysmail_add_account_sp
@account_name = 'DBA Sendgrid Account',
@description = 'DB account for DBAs and SQL Agent',
@email_address = 'john.mccormack@*****.***',
@display_name = @servername,
@mailserver_name = 'smtp.sendgrid.net',
@mailserver_type = 'SMTP',
@username = 'apikey',
@password = '******************',
@port = 587,
@enable_ssl = 1;
END
ELSE
PRINT 'sysmail_account already configured'

-- Create a database mail profile (Profile must be called AzureManagedInstance_dbmail_profile)
IF NOT EXISTS (SELECT 1 FROM msdb..sysmail_profile WHERE name = 'AzureManagedInstance_dbmail_profile')
BEGIN
EXECUTE msdb.dbo.sysmail_add_profile_sp
@profile_name = 'AzureManagedInstance_dbmail_profile',
@description = 'Main profile for sending database mail';

-- Associate account with profile
EXECUTE msdb.dbo.sysmail_add_profileaccount_sp
@profile_name = 'AzureManagedInstance_dbmail_profile',
@account_name = 'DBA Sendgrid Account',
@sequence_number = 1 ;
END
ELSE
PRINT 'DBMail profile already configured'

Send a test email

-- Test Email
EXEC msdb.dbo.sp_send_dbmail
@profile_name = 'AzureManagedInstance_dbmail_profile',
@recipients = 'john.mccormack@*****.***',
@body = 'Email successfully sent from managed instance.',
@subject = 'OK, this works now. Thats great!';

So that’s all there is to it. Now you know how to set up database mail for Azure SQL DB Managed Instance.

If you have any comments or suggestions, please tweet me or leave them in the comments section.

John

More handy Azure links

How do I find the agent service account for Azure SQL Database Managed Instance

Change a user’s resource class within Azure Synapse Analytics using Azure Automation runbooks

Images to help you set up with sendgrid configuration for database mail

Create sendgrid account in Azure Portal
Create Sendgrid

Manage Sendgrid button in Azure Portal
Manage Sendgrid

Filed Under: Azure SQL DB Managed Instance, front-page Tagged With: azure, azure sql db, azure sqldb managed instance, database mail, managed instance, sendgrid

How do I find the agent service account for Azure SQL Database Managed Instance

25th September 2020 By John McCormack 1 Comment

How do I find the agent service account for Azure SQL Database Managed Instance

Normally if you want to know which service accounts run your SQL Server Agent, you can just run:

SELECT servicename, service_account FROM sys.dm_server_services

However this draws a blank when you run it on Azure SQL DB Managed Instance. So how do you find the agent service account for Azure SQL Database Managed Instance?

I’ve came up with 3 suggestions so far:

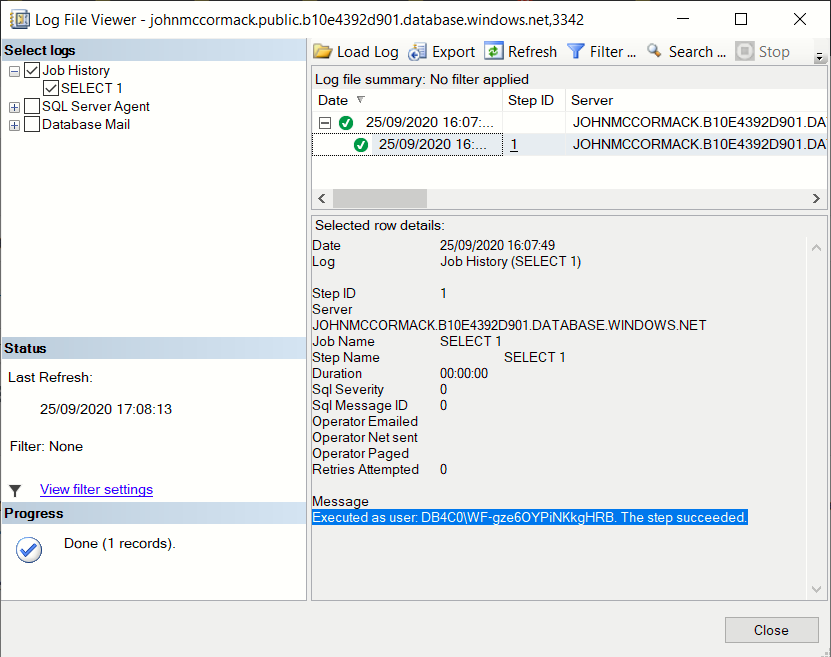
  1. Run an agent job and check which user ran it
  2. Check the error log
  3. Check sys.dm_exec_sessions

Run an agent job and check which user ran it

Output of SQL Server Agent Job

This is not exactly a very efficient process.

Check the error log

EXEC sp_readerrorlog 0,1,'service account'

Even if you cycle the error log, it will always be there but you’ll need to do some string manipulation to just pull out the credentials you need.

Check sys.dm_exec_sessions

(Thanks to David Alcock for this suggestion)

SELECT login_name FROM sys.dm_exec_sessions
WHERE program_name = 'SQLAgent - Generic Refresher'

This might be the best because it will only return one result and will only the login name, rather than a bunch of extra text as well.

Do you have a better way? Please let me know in the comments if you do.

John

Filed Under: Azure SQL DB Managed Instance, front-page Tagged With: azure, azure sql db, azure sqldb managed instance, SQL Agent service account

Change a user’s resource class within Azure Synapse Analytics using Azure Automation runbooks

17th December 2019 By John McCormack Leave a Comment

Change a user’s resource class within Azure Synapse Analytics | A solution

This post shows a method for allowing developers to change a user’s resource class within Azure Synapse Analytics | Azure SQL Data Warehouse without granting them membership of the db_owner fixed database role.

Scenario:

I was a approached by a data warehouse developer who wanted to be able to take advantage of the feature in Azure Synapse Analytics (Formerly Azure SQL Data Warehouse) called ‘Resource classes’. Resource classes allow users in certain roles to have access to extra compute resources for their queries. This can increase their max memory per query (although there is an overall trade-off on concurrency). Unfortunately, due to this being managed via roles, the person looking to change resource classes needs to be in the db_owner role so they can manage database role membership. As I didn’t want to add the developer to the db_owner role, a different solution was required.

Solution:

A separate sql user can be added to the db_owner role on the SQL Data Warehouse in question. We can then create a credential in azure automation based upon this user. Finally, we create a Runbook which executes db_addrolemember (but only allows a specific few roles related to resource groups). This means we can give an end user the ability to add/remove people by granting them access to run the runbook.

How to:

Create SQL login/user
-- Create sql login
CREATE LOGIN [dev_dba_automation] WITH PASSWORD = 'S3cur£P@ssword!'

-- Change into DWH context, not master
CREATE USER [dev_dba_automation] WITH DEFAULT_SCHEMA=[dbo]

-- FYI
-- ALTER ROLE X ADD MEMBER Y doesn't currently work with Azure SQL DWH
Create Azure Automation Credential

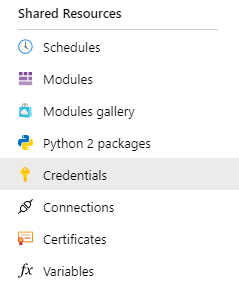
From your automation account, find the Credentials option (under shared resources) on the left hand menu.

Add Credential To Azure Automation

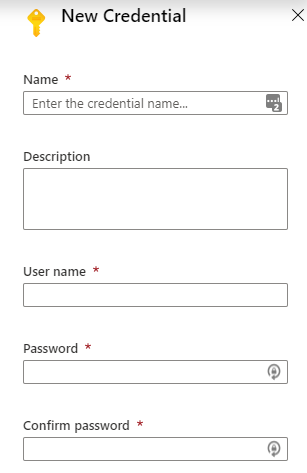
Then create your new credential, using the newly created sql login name as the user name and then add the correct password.

Add New Credential To Azure Automation

Please note if the end user has privileged access to Azure Automation with a role such as owner or contributor, they could use the credential to carry out other tasks in the data warehouse so please be careful about who will have access to creating new runbooks.

Create Runbook
  • Log into Azure Automation and create a new runbook.
  • Copy this Powershell code in.
<#
.DESCRIPTION
This runbook allows the person running it to add a database user to a
database role on dev-datawarehouse

.PARAMETER Database
String name of the SQL Server database to connect to

.PARAMETER databaserole
String name of the database role you wish to add a member to

.PARAMETER rolemember
String name of the user you wish to add to the database role

.PARAMETER add_or_drop
String Must = add for db_addrolemember or drop for sp_droprolemember

.NOTES
AUTHOR: John McCormack
LASTEDIT: Dec 16, 2019
#>

param(

[parameter(Mandatory=$True]
[string] $Database,

[parameter(Mandatory=$True]
[string] $databaserole,

[parameter(Mandatory=$True]
[string] $rolemember,

[parameter(Mandatory=$True]
[string] $add_or_drop
)

# Variables
$SqlCredentialAsset = 'dev_az_automation'
$SqlServer = 'dev-datawarehouse.database.windows.net'
$SqlServerPort = 1433
$SqlCredential = Get-AutomationPSCredential -Name $SqlCredentialAsset

if ($SqlCredential -eq $null)
{
throw "Could not retrieve '$SqlCredentialAsset' credential asset. Check that you created this first in the Automation service."
}
# Get the username and password from the SQL Credential
$SqlUsername = $SqlCredential.UserName
$SqlPass = $SqlCredential.GetNetworkCredential().Password

# Define the connection to the SQL Database
$Conn = New-Object System.Data.SqlClient.SqlConnection("Server=tcp:$SqlServer,$SqlServerPort;Database=$Database;User ID=$SqlUsername;Password=$SqlPass;Trusted_Connection=False;Encrypt=True;Connection Timeout=30;")

# Open the SQL connection
$Conn.Open()

# Run sp_addrolemember as the credential user
#$Cmd=new-object system.Data.SqlClient.SqlCommand("EXEC sp_addrolemember @rolename = $databaserole, @membername = $rolemember", $Conn)
if($add_or_drop -eq "add")
{
$Cmd=new-object system.Data.SqlClient.SqlCommand("EXEC sp_addrolemember @rolename = $databaserole, @membername = $rolemember", $Conn)
}
else
{
$Cmd=new-object system.Data.SqlClient.SqlCommand("EXEC sp_droprolemember @rolename = $databaserole, @membername = $rolemember", $Conn)
}
$Cmd.CommandTimeout=120

if ($databaserole -Like "*rc*")
{
# Execute the SQL command
$Ds=New-Object system.Data.DataSet
$Da=New-Object system.Data.SqlClient.SqlDataAdapter($Cmd)
[void]$Da.fill($Ds)

# We should look at adding some logging for this
WRITE-OUTPUT $rolemember $add_or_drop"ed to database role:$databaserole."
}
else
{
WRITE-OUTPUT "Invalid role"
}

# Close the SQL connection
$Conn.Close()
  • Run the workbook and observe the output.
Further reading
  • https://docs.microsoft.com/en-us/azure/sql-data-warehouse/resource-classes-for-workload-management#example-code-for-finding-the-best-resource-class
  • https://docs.microsoft.com/en-us/sql/t-sql/statements/alter-role-transact-sql?view=sql-server-ver15#examples
  • https://gallery.technet.microsoft.com/scriptcenter/How-to-use-a-SQL-Command-be77f9d2
    • (Base script I adapted)
Other Azure Content
  • https://johnmccormack.it/2019/03/put-tempdb-files-on-d-drive-in-azure-iaas/

Filed Under: Azure Automation, Azure SQL Data Warehouse, Azure Synapse Analytics Tagged With: azure, azure automation, azure sql data warehouse, azure synapse analytics

  • « Previous Page
  • 1
  • 2
  • 3
  • Next Page »
Privacy & Cookies: This site uses cookies. By continuing to use this website, you agree to their use.
To find out more, including how to control cookies, see here: Cookie Policy

John McCormack · Copyright © 2025


Loading Comments...