John McCormack DBA

SQL Server Databases and Cloud

  • Personal
    • About
  • Free Training
    • SQL Server on Amazon RDS (Free Course)
    • Free practice questions to help you pass DP-900
  • Save money in Azure
    • Azure IaaS SQL Backups – Stop burning money
    • Your Azure SQL Database and Managed Instance is too big
    • Turn the cloud off at bedtime to save 70%
    • Your Azure SQL Virtual Machine might be too big
    • Save money with Azure SQL DB serverless
    • Save up to 73% with reserved instances
    • Delete unused instances to save money in Azure
  • Hire me
    • 60 minute cost optimization
    • Let me solve your SQL Server problems
    • Take a look at my Sessionize speaker’s profile

Your Azure SQL Database and Managed Instance is too big

15th January 2021 By John McCormack Leave a Comment

Don’t buy for the future

With the cloud, it’s important to understand the concepts of scaling and elasticity. Your cloud services should be scaled at the right size to handle current workloads, with a small buffer. With Azure SQL Database, there is no need to buy that 32 vCore service, when all you need right now is 4. The rest will be available when you need them. You should be ready to scale up or out when the time is right but not before. With the cloud, you should shift your thinking from a CAPEX operating model to and OPEX operating model.

CAPEX vs OPEX

Capital Expenditure (CAPEX) describes where an up-front purchase is made to provide value into the future. e.g. A Server. Once it is purchased, you don’t need to buy it again and can use it until it outlives is usefulness. It’s a big upfront expense to provide long term value. For something like a database server, you might forecast what size you will need in 5 years and buy accordingly.

Operational Expenditure (OPEX) on the other hand describes ongoing costs and operating expenses. Items such as electrical power, rent and staff salaries come under OPEX. Pay As You Go cloud solutions fall under operational expenditure (OPEX) as they are ongoing costs. With this operating model, you should only pay for what you need, and adjust your scale as driven by demand, not future projections.

Resource utilisation and purchase models

Example graph for Azure SQL Database

DTU Model

Small to medium single databases can use the DTU purchase model which is a blend of cpu, memory and IO. They come with fixed storage per instance type. When monitoring performance, you should be looking mainly at DTU percentage used and storage percentage used.

If you are averaging above 85% and have regular peaks higher than that for DTU usage, you should scale up. You can adjust this figure based on how relaxed or nervous you are the DTU getting pinned at 100%.

If you are averaging below 50% and have few or no peaks above this, you can scale down. (Providing the lower class has enough storage) Again, adjust this to suit your own needs but there is no need to pay double unless you absolutely need to bake in a lot of spare capacity.

vCore

The vCore purchase model provides more flexibility than the DTU model. You can choose your compute and storage resources separately. There is no way to allocate extra memory however, this is bound to the number of vCores you have. Managed Instances only use the vCore purchase model.

I would apply a similar rule to scaling up or down here based on needs. Any instance using < 50% of CPU is a good candidate for scaling down.

Azure SQL Database Service Tiers

Ensure you are on the right service tier. Azure SQL Single DB comes with a choice of Basic, Standard and Premium.

Basic (DTU)

If you are on the basic service tier, then from a cost optimization process there is not too much more to say. It has the cheapest instance types, and the lowest resources so if it is doing a job for you, then there is no need to change. It only offers 7 days backup retention so be aware.

Standard (DTU)

A large number of workloads will be running on standard. If you are on the standard tier, you can scale down based on utilisation however you should bear a couple of things in mind.

  • S2 and below does not allow columnstore indexing
  • S1 instance types and below use HDD storage and this might have an impact on your query durations
    • S2 and above uses SSD

Premium (DTU)

Moving to the premium service tier should be well thought out as it includes the most expensive instances, and may mean that you are over provisioned. If you are on a premium instance, look closely at your utilisation, particularly DTU percent used. For seemingly over provisioned instances, you should also take note of a couple of factors before making a decision. Premium is particularly good for IO intensive queries due to a higher average IOPS and a lower IO latency.

Scaling down from premium service tier means:

  • A decrease in average IOPS from 25 to (1-4) IOPS per DTU
  • An increase in IO latency from 2ms to 5ms
  • A new maximum database size of 1 TB

* Changing instance size but staying with premium service tier affects resources only

If you can handle the drop in instance size and/or reduction in service tier, I would recommend scaling down. Remember to keep a closer eye on newly changed instances, and scale back up if performance is no longer acceptable.

https://docs.microsoft.com/en-us/azure/azure-sql/database/service-tiers-dtu

General Purpose (vCore)

General purpose is the budget option but is suitable for a lot of production workloads. If you are currently on GP and you are happy with your performance, then do not change to a higher service tier.

Business Critical (vCore)

Most production workloads can run in Business Critical but you might be over provisioned. 1 read-only replica is built into the price so you can offload read-only workloads to your replica. It doesn’t come cheap though and is more than double the price of a General Purpose instance due to increased hardware and licensing. Scaling down to General Purpose will take away this replica so beware if you use it. A good option may be to scale to a lower Business Critical Instance, so that you still have a read replica built into the price.

Hyperscale (vCore)

Hyperscale is not currently available with Managed instance. (January 2021)

Your instances on Hyperscale are roughly double the cost of General Purpose but less than Business Critical. The main considerations are database size and log write throughput. On an exceptionally busy and large database, hyperscale is often the best choice.

Be aware of the reduced performance and features available if you think you can scale down to General Purpose. Changing tiers down from Hyperscale is not a native or easy task. It isn’t supported so you will need to export and import your data to a new database.

Scaling down to GP means:

  • Your database must be less than 4TB
  • You will move to premium remote storage, rather than local SSD
  • You cannot continue to use In-Memory OLTP
  • It’s a lot of work

https://docs.microsoft.com/en-us/azure/azure-sql/database/service-tiers-general-purpose-business-critical

Summary

The main thing is to regularly review your instances and make sure you are not paying for too much headroom. Make sure that by scaling down, you still have the functionality you need. If you scale down and performance is not what you expected, you should scale back up. Cost optimization shouldn’t come at the expense of performance. It is about ensuring that you are paying for what you need, and nothing more.

If you missed it, please post 1 in this cost optimization series, please have a read about Azure IaaS SQL Backups.
IT Certification Category (English)728x90

Filed Under: Azure, cost-optimization, front-page Tagged With: azure billing, cost optimisation, cost optimization, managed instance, SQL Database, SQL DB

How do I set up database mail for Azure SQL DB Managed Instance

5th October 2020 By John McCormack 2 Comments

How do I set up database mail for Azure SQL DB Managed Instance

It’s not too difficult to set up database mail for Azure SQL DB Managed Instance in comparison to SQL Server (on-prem or IaaS) however there are a few extra things to consider. This post will describe how to set up database mail for Azure SQL DB Managed Instance. I will use Sendgrid as the mail provider but you can follow the same steps for any other mail provider or your company’s smtp server.

Before I go on, my personal opinion is that including database mail is a massive feature for Managed Instances. The lack of DB Mail on Azure SQL DB Single Database or Amazon RDS is a major blocker to PaaS adoption. Now with Managed Instance, we can have PaaS and database mail.

Create an Azure SQL DB Managed Instance

Whilst I’m planning a separate post on how to provision an Azure SQL DB Managed Instance, I’m going to assume for the purposes of this post that you already have an instance up and running. If you don’t, have a look at this howto article before going any further.

Change outbound settings on your Network Security Group (NSG)

All managed instances are created with a NSG. The NSG allows you to create inbound and outbound rules for traffic coming in and out of your database. You can configure ports, protocols and IP ranges etc.

To allow secure smtp for sendgrid, you must open port 587 for outbound traffic. Otherwise, any attempt to send mail will result in an error. You can do this in the Azure Portal by navigating to the NSG or you could do it in Powershell by modifying and running the code below.

# This code was originally taken from https://docs.microsoft.com/en-us/azure/service-fabric/scripts/service-fabric-powershell-add-nsg-rule
# and amended to be used to set up an outbound rule for Database Mail on Port 587

Login-AzAccount
Get-AzSubscription
Set-AzContext -SubscriptionId "yourSubscriptionID"

$RGname="RG-JOHN-DEMO"
$port=587
$rulename="DBMailOutbound"
$nsgname="nsg-johnmccormack-demo"

# Get the NSG resource
$nsg = Get-AzNetworkSecurityGroup -Name $nsgname -ResourceGroupName $RGname

# Add the inbound security rule
$nsg | Add-AzNetworkSecurityRuleConfig -Name $rulename -Description "Allow DBMail" -Access Allow `
-Protocol * -Direction Outbound -Priority 500 -SourceAddressPrefix "*" -SourcePortRange * `
-DestinationAddressPrefix * -DestinationPortRange $port

# Update the NSG
$nsg | Set-AzNetworkSecurityGroup

Set up a sendgrid account

The simplest way if you haven’t done it before is just to use the Azure Portal.

  1. Start typing sendgrid in the search bar
  2. Click on Sendgrid accounts from services
  3. Click + Add
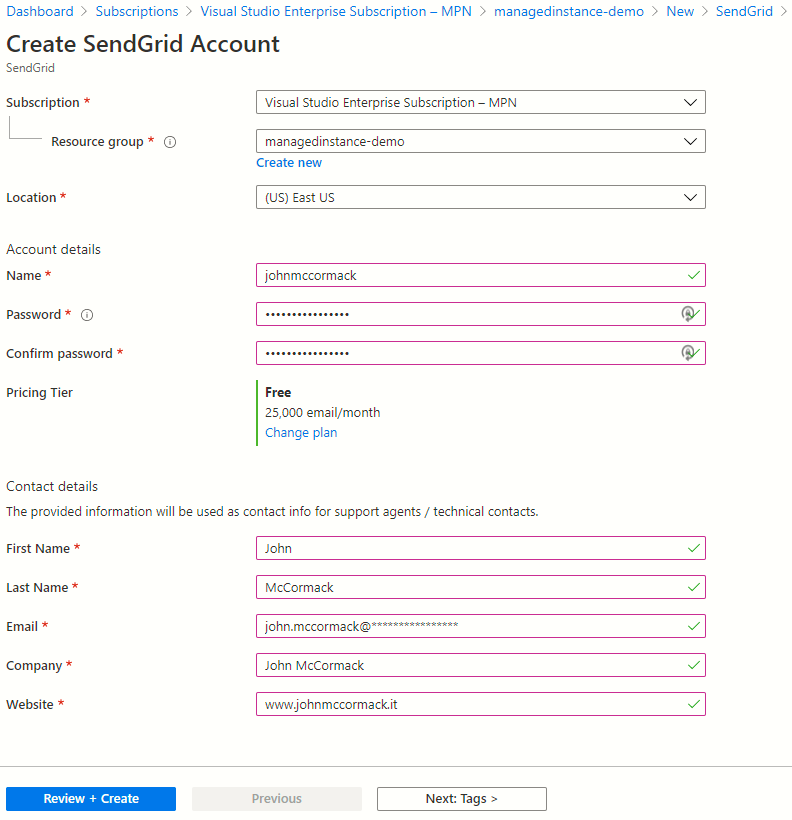
  4. Complete the form to create your new account. (See image at bottom of post)
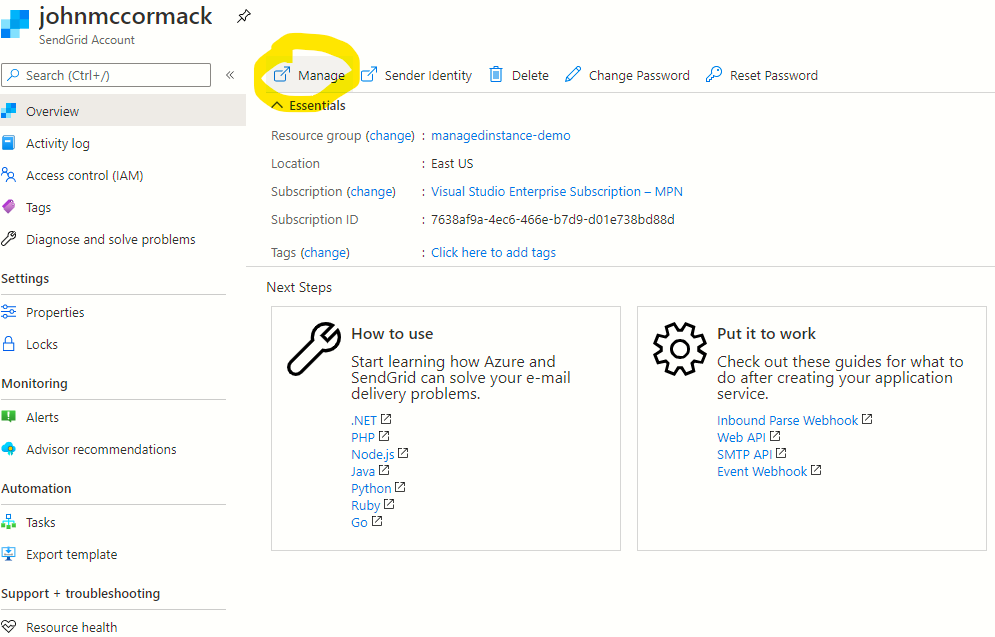
  5. Click manage sendgrid to get the credentials you will need for Database Mail (See other at bottom of post)
    1. Once you are logged in:
      1. Click Settings
      2. Click API Keys
      3. Click Create API Key
      4. Create and verify a sender identity. (If you don’t do this, no sendgrid emails will work)

Enable database mail for your Managed Instance

You must run this t-sql code to enable database mail on your Managed Instance:

EXEC sp_configure 'show advanced options', 1
RECONFIGURE

EXEC sp_configure 'Database Mail XPs', 1
RECONFIGURE

Create a suitable database mail account and profile

Your database mail profile must be called AzureManagedInstance_dbmail_profile. If you try to call it anything else, your database mail won’t work.

-- Create a database mail account
IF NOT EXISTS (SELECT 1 FROM msdb.dbo.sysmail_account WHERE [name] = 'DBA Sendgrid Account')
BEGIN
DECLARE @servername NVARCHAR(255) = @@servername
SET @servername = substring(@servername, 1, charindex('.', @servername)-1)
EXECUTE msdb.dbo.sysmail_add_account_sp
@account_name = 'DBA Sendgrid Account',
@description = 'DB account for DBAs and SQL Agent',
@email_address = 'john.mccormack@*****.***',
@display_name = @servername,
@mailserver_name = 'smtp.sendgrid.net',
@mailserver_type = 'SMTP',
@username = 'apikey',
@password = '******************',
@port = 587,
@enable_ssl = 1;
END
ELSE
PRINT 'sysmail_account already configured'

-- Create a database mail profile (Profile must be called AzureManagedInstance_dbmail_profile)
IF NOT EXISTS (SELECT 1 FROM msdb..sysmail_profile WHERE name = 'AzureManagedInstance_dbmail_profile')
BEGIN
EXECUTE msdb.dbo.sysmail_add_profile_sp
@profile_name = 'AzureManagedInstance_dbmail_profile',
@description = 'Main profile for sending database mail';

-- Associate account with profile
EXECUTE msdb.dbo.sysmail_add_profileaccount_sp
@profile_name = 'AzureManagedInstance_dbmail_profile',
@account_name = 'DBA Sendgrid Account',
@sequence_number = 1 ;
END
ELSE
PRINT 'DBMail profile already configured'

Send a test email

-- Test Email
EXEC msdb.dbo.sp_send_dbmail
@profile_name = 'AzureManagedInstance_dbmail_profile',
@recipients = 'john.mccormack@*****.***',
@body = 'Email successfully sent from managed instance.',
@subject = 'OK, this works now. Thats great!';

So that’s all there is to it. Now you know how to set up database mail for Azure SQL DB Managed Instance.

If you have any comments or suggestions, please tweet me or leave them in the comments section.

John

More handy Azure links

How do I find the agent service account for Azure SQL Database Managed Instance

Change a user’s resource class within Azure Synapse Analytics using Azure Automation runbooks

Images to help you set up with sendgrid configuration for database mail

Create sendgrid account in Azure Portal
Create Sendgrid

Manage Sendgrid button in Azure Portal
Manage Sendgrid

Filed Under: Azure SQL DB Managed Instance, front-page Tagged With: azure, azure sql db, azure sqldb managed instance, database mail, managed instance, sendgrid

Privacy & Cookies: This site uses cookies. By continuing to use this website, you agree to their use.
To find out more, including how to control cookies, see here: Cookie Policy

John McCormack · Copyright © 2025


Loading Comments...