How do I set up database mail for Azure SQL DB Managed Instance
It’s not too difficult to set up database mail for Azure SQL DB Managed Instance in comparison to SQL Server (on-prem or IaaS) however there are a few extra things to consider. This post will describe how to set up database mail for Azure SQL DB Managed Instance. I will use Sendgrid as the mail provider but you can follow the same steps for any other mail provider or your company’s smtp server.
Before I go on, my personal opinion is that including database mail is a massive feature for Managed Instances. The lack of DB Mail on Azure SQL DB Single Database or Amazon RDS is a major blocker to PaaS adoption. Now with Managed Instance, we can have PaaS and database mail.
Create an Azure SQL DB Managed Instance
Whilst I’m planning a separate post on how to provision an Azure SQL DB Managed Instance, I’m going to assume for the purposes of this post that you already have an instance up and running. If you don’t, have a look at this howto article before going any further.
Change outbound settings on your Network Security Group (NSG)
All managed instances are created with a NSG. The NSG allows you to create inbound and outbound rules for traffic coming in and out of your database. You can configure ports, protocols and IP ranges etc.
To allow secure smtp for sendgrid, you must open port 587 for outbound traffic. Otherwise, any attempt to send mail will result in an error. You can do this in the Azure Portal by navigating to the NSG or you could do it in Powershell by modifying and running the code below.
# This code was originally taken from https://docs.microsoft.com/en-us/azure/service-fabric/scripts/service-fabric-powershell-add-nsg-rule
# and amended to be used to set up an outbound rule for Database Mail on Port 587

Login-AzAccount
Get-AzSubscription
Set-AzContext -SubscriptionId "yourSubscriptionID"

$RGname="RG-JOHN-DEMO"
$port=587
$rulename="DBMailOutbound"
$nsgname="nsg-johnmccormack-demo"

# Get the NSG resource
$nsg = Get-AzNetworkSecurityGroup -Name $nsgname -ResourceGroupName $RGname

# Add the inbound security rule
$nsg | Add-AzNetworkSecurityRuleConfig -Name $rulename -Description "Allow DBMail" -Access Allow `
-Protocol * -Direction Outbound -Priority 500 -SourceAddressPrefix "*" -SourcePortRange * `
-DestinationAddressPrefix * -DestinationPortRange $port

# Update the NSG
$nsg | Set-AzNetworkSecurityGroup
Set up a sendgrid account
The simplest way if you haven’t done it before is just to use the Azure Portal.
- Start typing sendgrid in the search bar
- Click on Sendgrid accounts from services
- Click + Add
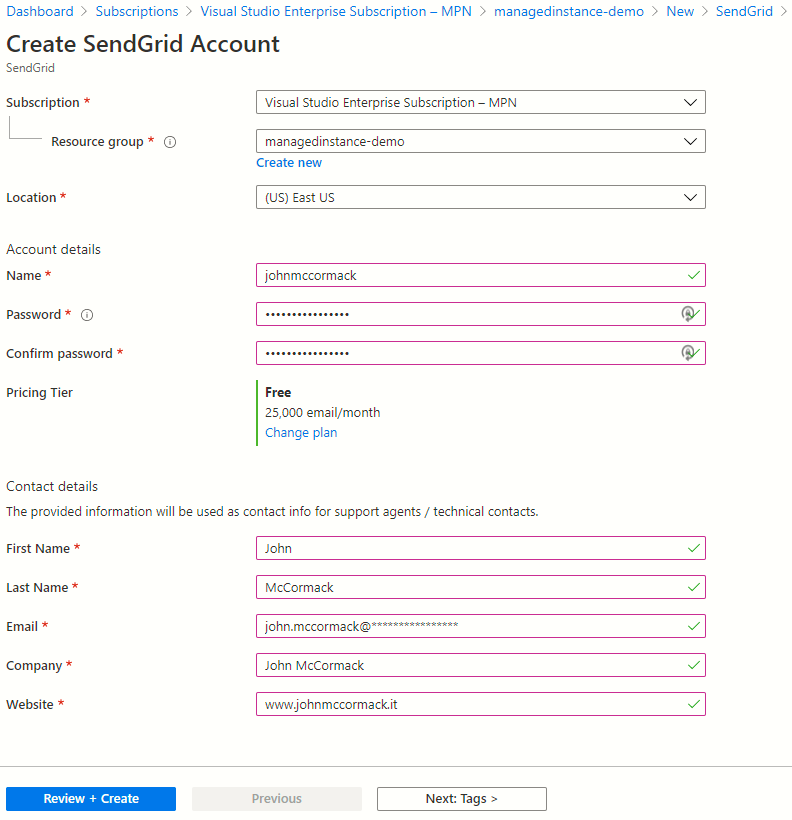
- Complete the form to create your new account. (See image at bottom of post)
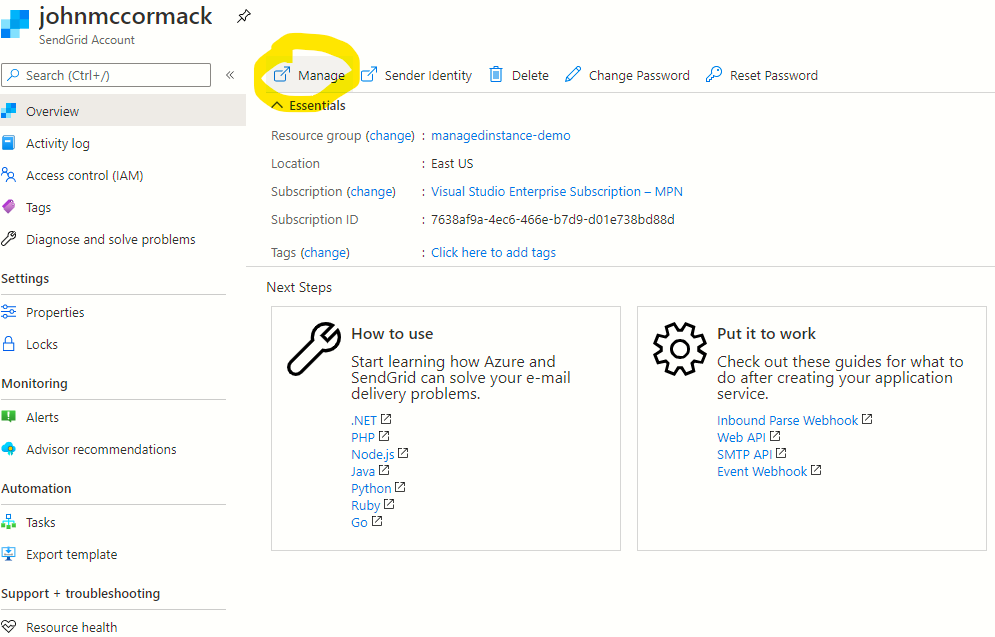
- Click manage sendgrid to get the credentials you will need for Database Mail (See other at bottom of post)
- Once you are logged in:
- Click Settings
- Click API Keys
- Click Create API Key
- Create and verify a sender identity. (If you don’t do this, no sendgrid emails will work)
- Once you are logged in:
Enable database mail for your Managed Instance
You must run this t-sql code to enable database mail on your Managed Instance:
EXEC sp_configure 'show advanced options', 1
RECONFIGURE

EXEC sp_configure 'Database Mail XPs', 1
RECONFIGURE
Create a suitable database mail account and profile
Your database mail profile must be called AzureManagedInstance_dbmail_profile. If you try to call it anything else, your database mail won’t work.
-- Create a database mail account
IF NOT EXISTS (SELECT 1 FROM msdb.dbo.sysmail_account WHERE [name] = 'DBA Sendgrid Account')
BEGIN
DECLARE @servername NVARCHAR(255) = @@servername
SET @servername = substring(@servername, 1, charindex('.', @servername)-1)
EXECUTE msdb.dbo.sysmail_add_account_sp
@account_name = 'DBA Sendgrid Account',
@description = 'DB account for DBAs and SQL Agent',
@email_address = 'john.mccormack@*****.***',
@display_name = @servername,
@mailserver_name = 'smtp.sendgrid.net',
@mailserver_type = 'SMTP',
@username = 'apikey',
@password = '******************',
@port = 587,
@enable_ssl = 1;
END
ELSE
PRINT 'sysmail_account already configured'

-- Create a database mail profile (Profile must be called AzureManagedInstance_dbmail_profile)
IF NOT EXISTS (SELECT 1 FROM msdb..sysmail_profile WHERE name = 'AzureManagedInstance_dbmail_profile')
BEGIN
EXECUTE msdb.dbo.sysmail_add_profile_sp
@profile_name = 'AzureManagedInstance_dbmail_profile',
@description = 'Main profile for sending database mail';

-- Associate account with profile
EXECUTE msdb.dbo.sysmail_add_profileaccount_sp
@profile_name = 'AzureManagedInstance_dbmail_profile',
@account_name = 'DBA Sendgrid Account',
@sequence_number = 1 ;
END
ELSE
PRINT 'DBMail profile already configured'
Send a test email
-- Test Email
EXEC msdb.dbo.sp_send_dbmail
@profile_name = 'AzureManagedInstance_dbmail_profile',
@recipients = 'john.mccormack@*****.***',
@body = 'Email successfully sent from managed instance.',
@subject = 'OK, this works now. Thats great!';
So that’s all there is to it. Now you know how to set up database mail for Azure SQL DB Managed Instance.
If you have any comments or suggestions, please tweet me or leave them in the comments section.
John
More handy Azure links
How do I find the agent service account for Azure SQL Database Managed Instance
Change a user’s resource class within Azure Synapse Analytics using Azure Automation runbooks
Images to help you set up with sendgrid configuration for database mail

